| How to build a PSX-PC adaptor cable?
|
Words before beginning
Following with the preliminaries,
I will going to make clear that you do not need any knowledge electronics, although
knowing how to soldier and know how to handle a multi-meter. If you do not have
any idea, or don't want to do it get a friend who knows to help you.
List of components
And in addition...
- Soldering iron.
- Soldier, lead-tin mix.
- Multi-Meter.
- Scissors or wire cutters.
- Paper and pen.
- A pin.
- And desire for an adventure itself...
Beginning by the principle
Take the extension cord and cut the
cable shortly before arriving at the end where the male connector is connected.
Cut the cable with the scissors with care not cutting any of wiers that are
in the interior. Now cut each one of these wires (except the one that does not
have insulator that you can cut it directly) removing little insulation from
the ends of the wires so you have bare wire.
Verify that it has at least 7
wires without counting the one that is bare. If you have a dual-shock
compatible pad make sure it has 8 wires.
We are going to find out to what
hole of the female connector is connected to which small wire. Take the female
connector of the cable and put the pin in each one of the holes to make contact
and, using the multi-meter on resistant setting, write down to what hole corresponds
each wire of the other end. So stick the pin on hole 1 then touch the ends of
the wires until you find the one that matches the corresponding hole. Don't
be to worried if you don't find a wire for each hole there are only 7 or 8 wires
and 9 holes.
Well, we now have written on the
paper the relation of the holes from the 1 to the 9 and to what cable color
in the other end corresponds to each one of them. Keep this paper in a safe
place that you will need it later.
The circuit:

This it is the diagram. The DB25-x connections
correspond to the male connector that will be connected
to the parallel port. The drawings in red represent the diodes. The gray connector
is thefemale connector
of the extension. The connections in blue are only necessary if we are going
to use the Force Feedback.
If you want a fast diagram, here
you have one equivalent one to the previous one
(this circuit is not different from the previous one):
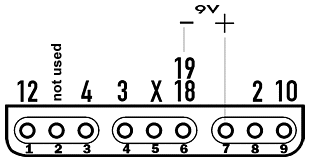
This diagram represents the female of the extension. The numbers
that are above
correspond to the DB-25. Remembers that the 9 V are only necessary for the
Force
Feedback.
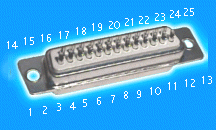
Tin-plating DB-25
connectors
Take DB-25 connector and tin-plate the ends where we are going to make
the connections, that are 2, 3, 4, 5, 6, 7, 8, 9, 10, 12, 18 and 19. Look
to the attached figure considering that the part that is seen in
drawing is the part where we are going to soldier. The pins where we are
going to make connections are in red. The pins in blue are those that we will use if we connect
a second pad.
|
CONNECTOR DB-25

Where the cables will be soldiered
|
Soldiering the diodes
Now for the delicate
part. Take the 5 diodes and it cuts the ends that are on the side opposition
to the mark (what marks? see the figure alongside see the correspondence
with the drawing in the picture and the real diode) leaving more or less
half centimeter (like in the previous image). Now we take the soldering
iron and tin-plate the end of each diode taking care that you do not taking
too long doing it or you can damage the diode by the heat.
|
 |
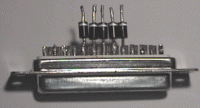
| Next we will take the
DB-25 connector with the corresponding tin-plated ends (you did do in the
previous section) and soldier the short ends of each one of the diodes in
ends 5, 6, 7, 8 and 9 of the DB-25 connector. Remember that you must weld
the 5 diodes in the correct direction. It should look like image alongside.
|
 |
And finally, soldiering
wires
And we are now in the last of the
mechanical part. Going by the diagram of the circuit on the paper where you
wrote down the corresponding wires of your extension to the holes of the female
connector. Soldier the corresponding pin to each of the wires from the extension.
The wire that corresponds to hole
5 of the connector you have it to weld to the other ends of the 5 diodes. Soldier
the wire to the end of the central diode and soldier the 5 diodes together as
it appears in the circuit. using a spare piece of wire.If you pay attention,
hole 6 of the female connector must go connected to pins 18 and 19 of connector
DB-25. Soldier the corresponding wire of the extension to any of the two pins
and connect the two pins together.
Only
if you want to use the a Force Feedback pad...
a cable of two threads of 0.5m of
different colors (ei. red and black) and it connect the red wire to the wire
of the extension that corresponds to hole 7. The other wire (the black) you
soldier to pin 18 or 19 or where it connected the wire that corresponds of hole
6.
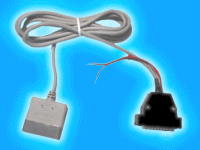
| The other end of this
cable we connected to the power supply having TAKEN CARE to connect
the black to the negative (-) and the red
to the positive (+). Make sure that the voltage is 9v using
a milti-meter. And it is ready.
Review all the connections before connecting the DB-25 connector to the
parallel port!!
|
 |
Drawings of the final result
WITHOUT
FORCE FEEDBACK:
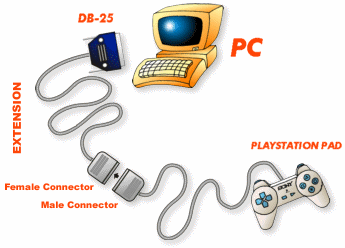
WITH
FORCE FEEDBACK:

Installing the DirectPad
driver
- Get the newest DirectPad drivers
dpadpr50.zip and unzip it to a temp directory
anywhere, ei., C:\DPAD.
- Once the pad and the DB-25 connector
are connected to the parallel port, Open the Control Panel and double
click on Games Controllers.
- Click on Add... then
Add Other... click on Have Disk... and then browse to when
you unziped it. (C:\DPAD) Click OK a couple of times then Finish
to complete the install of the driver.
- For me I had to click Add...
again then select DriectPad Pro Force Feedback Controller and ok to
add it.
- It should now be listed in the
section with your other controllers.
- Now to configure the driver to
use it with the PSX pad.
- On the Configure tab select
the Controller Type you want (PSX digital or PSX left/right
Analog)
- You can go through the other settings
and tabs to completely change everything but for the first time you should
leave most of it alone. Maybe except to Calibrate the controller
Remember: to only select the Force
Feedback driver if you have the 9v power addon other wise select the DirectPad
Pro Controllerdriver.
Appendix A. Connecting
a second PlayStation Pad to the same parallel port
For those of you who want to connect
your secend PSX pad to a PC this is how you do it. The second pad will have
a all functionality (all the buttons work and even force-feedback). Before beginning
with the explanation I must make clear to you that I have not made the assembly.
In theory if first pad works the second would have to also work perfectly. Lets
begin already...
It is simple. Buy a second PSX extension
cable and with a little skill you soldier all wires to the same DB-25 connector
you used for your first pad except the wires that would go to pins 10 and 12
of the DB-25. Instead they would be connected like this:
- The wire that would go to pin
10 of the DB-25 goes to pin 13
- The wire that would go to pin
12 of the DB-25 goes to pin 15
As I said before all the other wires
get connected the same way as pad one. This can be a little tricky with two wires
into one end of the DB-25 connector. if having troubles soldier the two wires
together first then soldier them the the DB-25.
If still you need a diagram, here
you go:
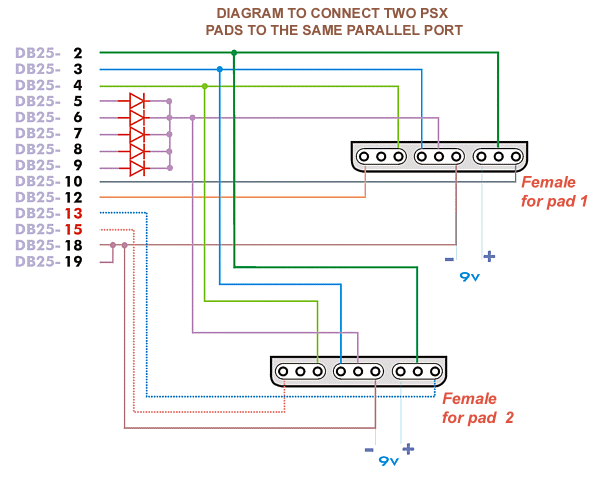
The dotted connections and the numbers in red of the DB-25 correspond
to the
variations with respect to the original design. Quick attention to these changes.
If you
are going to use FORCE FEEDBACK in both pads, you would have to provide the
9v
separately to each one of pads.
Now you must do is to install another
a second DirectPad driver the same way that you did the first time but this
time. For the second DirectPad driver select ID 2. You should be able
to configure the second pad the same as you did for pad one.
If, once connected, they both do
not work, chances are your parallel port is not able to feed both pads the 5v
power they need. Look below on how to get more power to the pads.
Appendix B. Getting the
9v and/or the 5v from the inside the PC
This will require you to open the
computer. So if you don not want to do this you don't have to. (although it
is almost impossible that you break anything with this)
Before starting, we are going to
make sure that you have a free power connector. Open the computer, and it looks
for the power supply (it is one the little box attached to the top rear of the
case with a bunch of wires coming out of it). Most of the wires end in with
connector that can connected to the hard disks, CD-ROMs, etc. They are similar
to this:
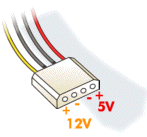
Make sure the colors are the same.
If you do not have any free connectors. In this case you can buy an accessory
that makes two connectors from one single one, (y-adapter) but you risk to overload
the power supply (unlikely).
You can see that red
wire provides 5v (+) and the Black wire is
ground (-)
. Directly connect the
hole of the 5v in the connector to feed pad if our parallel is not able to provide
enough power. Connect it to pin 5 of the pads. (see below for more on how to do
this).
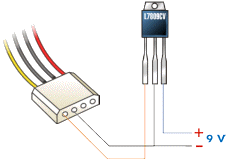
If what you need is 9v or too lazy
to get and external power supply, you can get that from inside too. We are going
to obtain them of the yellow wire (+) and black wire
(-). No, I am not mistaken, yellow wire
is 12v, but for that we have voltage regulator L7809CV:
|
COMPONENT
|
DRAWING
|
|
1 voltage regulator L7809CV
|

|
|
|
|
This device will transform the 12v
into 9v, connect the regulator and wires this way:
And that is it. You can get rid of
your troublesome power supply and enjoy this connection. You will not need to
plug in a power supply as when you turn on you computer you'll have power to
the pad(s) also!
Appendix C. Some problems
It seems that some problems with
the assembly exist (aint this always the case?). The most common problem is
that it does not do anything. After making sure all the connections are correct
(you did this first didn't you?).
PROBLEM 1. Nothing
of anything in the driver works
Symptoms:
- Once connected everything (it
gives just as it is dual-shock or not), we verified in the configuration of
the driver none of the buttons nor any directional ones work.
- The directional digitals (the
cross) works, but when pressing the Analog button to be able to use both analog,
the light blinks and does not stay on.
Cause:
The parallel port of the computer
to that you are connecting the cable is not the supplying enough power from
the 5v, low current.
Solution 1:
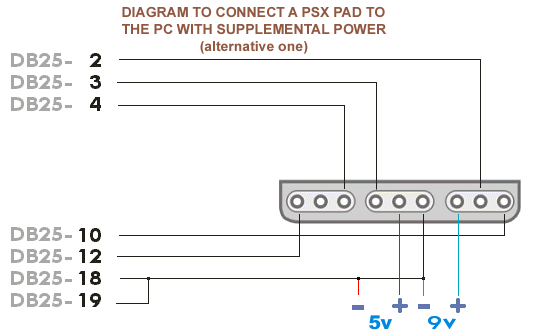
To feed we pad with 5v by
means of an external power supply (a second power block, if we were using the
Force Feedback). With either power from a external power block or power from
inside the computer they both are connected the same way. Connect the 5v
to pin 5 of the pad (were the diodes connected) and the ground
to pins 18 and 19 of the DB-25 connector. (see diagram below) If all
is done right when you press the analog button the light should stay on.
The solution is simple, although
a little troublesome. This is the way I did it.
Solution 2:
(this does not make since to me so
I just left it as is) This solution usually complements to 1ª. If even after
feeding the 5 V, does not work anything (except button ANALOG, that now ignites
the light), you will have to make a small modification in the connections. Simply
it clears the diode that is welded to pin 9 of the DB-25 and directly welds
a cable that goes connected to that already it is welded in the other end of
the other 4 diodes. The scheme would be thus now:
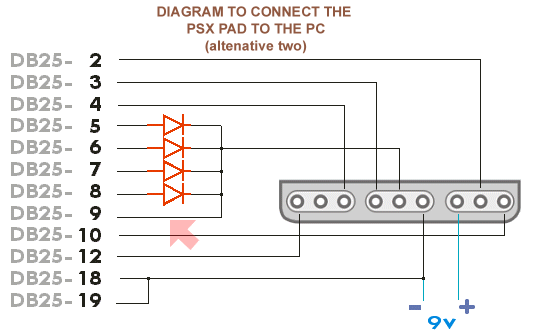
If V does not respond pad to you after putting the 5 to him,
proves to clear the diode of
pin 9 and connectsdirectly to the cable of the extension that would go in
the other end
of the diode.
PROBLEM 2. Pad works
perfectly in driver but in some games it does not work
Symptom:
In the driver all the buttons respond
perfectly but in the games it does not work or only the buttons work, not d-pad
or the analog ones.
Cause:
The game is not configured for the
type of signals that DirectPad provides.
Solution:
In the driver change the type of
controller (Controller Type) to Digital PSX if you want digital
control. If you want analog chooses PSX Left Analog or PSX Right Analog.
PROBLEM 3. Pad works
perfectly in driver, but, although the game detects it, does not work at all
Symptom:
Pad does not respond in the game,
although everything in the driver seems to be correct.
Cause:
The game does not initialize pad
correctly.
Solution:
Before executing the game enter game
configuration and select it in Properties of driver. Close everything and executes
the game.(???)
PROBLEM 4. When installing
driver leaves the typical blue screen of death
Symptom:
Blue screen of death and impossibility
to use Windows.
Cause:
There is a conflict in driver or
devices with DirectPad.
Solution:
The only solution that I know is
to enter way of failures on approval (F8 when starting windows), to deselect
that driver and to prove conflict with another one. Those that we have in the
section Complements (for pads of 6 and 8 buttons) do not give problems.
[Back to main]
This side is maintain by Wisely Ding,
GreenBird Workshop.


